TL;DR: If you really want to get my deeper commentary on the value of what Zerto for Kubernetes provides and go a bit beyond the lab, skip down to the section: “The Part Where Everything Comes Together,” although there might be some nuggets along the way!
Welcome back. This is Part 2 of a series on Zerto and Kubernetes. In Part 1 we took a look at the features available with Zerto, including my favorite: Data Protection as Code.
Here, we are going to kick the tires on Zerto for Kubernetes (Z4K), based on Zerto’s Hands-on labs, which anyone can get through a registration to myZerto.
The lab I used for this post is “Up and Running with Zerto for Kubernetes”, available once you register at myZerto. I am using this lab because it has everything I need. It’s also something you can run yourself.
You also do have the option of running the Zerto Trial as well, so you can try this out on your own stuff.
What we will do here is very realistic because what you do here is what you will do, “IRL” as they say:
- We’ll install an application in K8s.
- We’ll Install Zerto for Kubernetes.
- We’ll Setup a VPG and Install the Pods/Storage to replicate everything.
- We’ll tag a VPG for protection.
- We’ll restore a VPG.
Hands On with Zerto for Kubernetes: Setup
Like I said, we’re using the myZerto Labs, and a few items of note:
- Plan on doing the lab more than once.
- The first time through, just make sure it works as intended, and of course take your time.
- IMPORTANT: Make sure you read everything carefully, and the main thing is that you’ll need your Student Number, which is different each time.
- The second time through is where you can experiment, which I am doing here.
- You might consider using the RDP session for ease of copy/paste, but there are buttons for that as well if you are running the default interface.
Outside of that, it should be pretty straightforward. For the sake of not turning this post into a how-to on the lab, we are going to assume that we’ve logged in and setup the app already (a simple guestbook app along with K8Dash) and we’ll get started with the install of Zerto for Kubernetes.
Installing Zerto for Kubernetes Using Helm
The installation is a straightforward Helm chart, so let’s walk through it:
root@UbuntuLinux-1:~> helm repo add zerto https://zapps-helm.zerto.com/z4k/stable
"zerto" has been added to your repositories
root@UbuntuLinux-1:~> helm repo update
Hang tight while we grab the latest from your chart repositories...
...Successfully got an update from the "zerto" chart repository
Update Complete. ⎈Happy Helming!⎈
root@UbuntuLinux-1:~> kubectl create namespace zerto
namespace/zerto created
From the Lab (great explanation!):
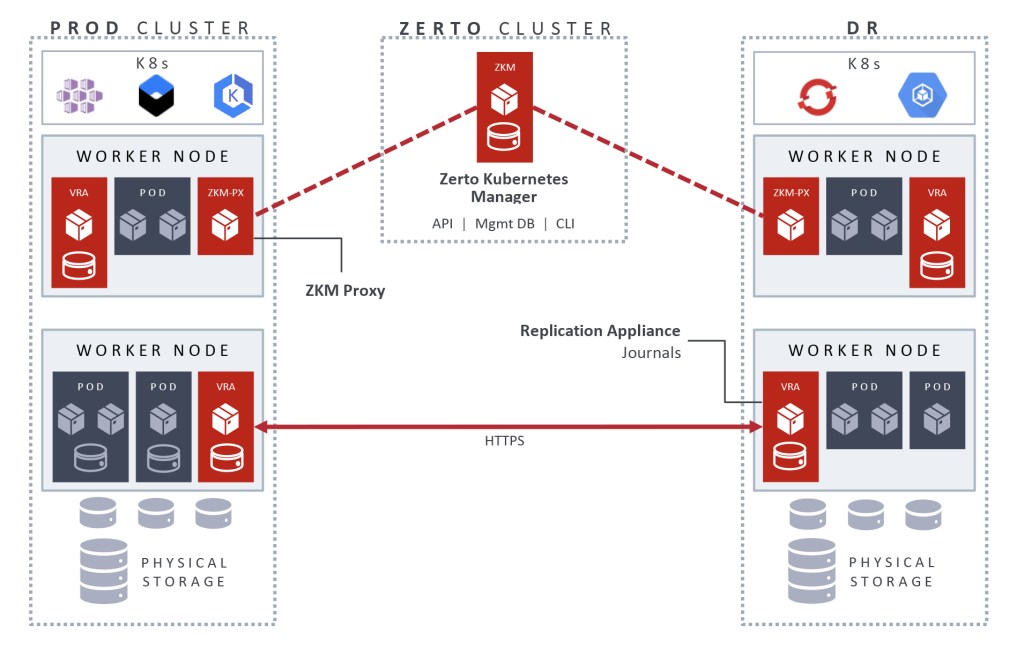
“Now we’ll install two key components, the Zerto Kubernetes Manager (ZKM) and the ZKM proxy (ZKM-PX). The ZKM is a global manager for all Z4K sites within an account and manages the overall deployment, including cross-site replication. The ZKM-PX is a more lightweight ZKM that’s specific to just one site. When using multiple Z4K sites and clusters, you’d only need one ZKM overall but multiple proxies—one for each cluster.”
“For installation, we can install both the ZKM and ZKM-PX together simultaneously because we only have one cluster; if we already had a ZKM elsewhere, we’d only need to install the ZKM-PX. Let’s get started by editing the values & parameters used in installation with Helm.”
root@UbuntuLinux-1:> nano values.yaml ## OR VIM!!!
Enter a username and password of your choice for management and enter a siteID. Here’s what I did:
global:
  imagePullSecret: "[REDACTED]" # Keep this as it is in the file.
  authentication:
    adminUser: "labuser"
    adminPassword: "ZertoLabs123!"
    managementUser: "bryan"
    managementPassword: "ZertoLabs123!"

zkm-px:
  config:
    siteId: "myz4ksite"
Next, you’ll notice that the install is a straightforward Helm installation:
root@UbuntuLinux-1: helm install z4k zerto/z4k -f values.yaml --namespace zerto
After that you will copy over the Zerto Plugin for kubectl.
Creating a Zerto VPG
A VPG, a “Virtual Protection Group,” is a Zerto concept. Very simply, it is a defined set of resources you are telling Zerto to Protect. The “more traditional” VPGs have been things like VMs and what not, here we are going to protect the Kubernetes guestbook application.
We’ll be using kustomize to build the infrastructure Pods for Zerto itself, and we’ll also create the actual VPG and its sites.
First things first, we’ll be editing the yaml to set up our sites. Here, we’ll be using the same site for source and destination. From the lab:
“Doing so enables local, same-site replication within a single cluster. For multi- or cross-cluster replication, you’d need to use the name of the 2nd Zerto site on the other cluster.”
To setup this group, you’ll setup a file called vpg.yaml that will setup the VPG. The final product looks like this”
apiVersion: z4k.zerto.com/v1
kind: vpg
spec:
   Name : gb_vpg
   SourceSite :
     Id: "myz4ksite"
   TargetSite :
     Id: "myz4ksite"
   RecoveryStorageClass : default
   JournalHistoryInHours: 24
You should be able to follow the instructions in the lab to use kustomize and kubectl apply to get these up and running:
root@UbuntuLinux-1:~> kubectl apply -k ./ # KUSTOMIZE FLAG!
. . .
root@UbuntuLinux-1:~> kubectl get pods
NAME             READY   STATUS    RESTARTS   AGE
frontend-0       1/1     Running   0          2m37s
redis-master-0   1/1     Running   0          2m28s
redis-slave-0    1/1     Running   0          118s
root@UbuntuLinux-1:~> kubectl create -f vpg.yaml
vpg.z4k.zerto.com/gb_vpg created
root@UbuntuLinux-1:~> watch -n 10 kubectl get ztasks

Every 10.0s: kubectl get ztasks                                                                                                                                     UbuntuLinux-1: Wed Jun  2 00:20:54 2021

ID             VPG      NAME            DESCRIPTION         STATUS       STARTTIMEUTC          ENDTIMEUTC   ERROR   TASKID
b84de6269f4b   gb_vpg   CreateVpgTask   Create VPG gb_vpg   InProgress   06/02/2021 04:19:35                        gb_vpg
With the Zerto kubectl plugin, you can see the VPGs and what they are doing at any time:
root@UbuntuLinux-1:~> kubectl get vpgs
NAME STATE SYNC SOURCE TARGET STATEFULSETS DEPLOYMENTS SERVICES CONFIGMAPS SECRETS NUMCP RPO JOURNALHISTORY JOURNALSIZEMB
gb_vpg Creating myz4ksite myz4ksite 3 0 6 0 0
This will take some time, as the VPG will need to be created and the first sync will need to take place.
The Part Where Everything Comes Together
First of all, let’s take a deeper dive into get information about the VPG we’ve created:
root@UbuntuLinux-1:~> kubectl get vpgs
NAME     STATE        SYNC   SOURCE      TARGET      STATEFULSETS   DEPLOYMENTS   SERVICES   CONFIGMAPS   SECRETS   NUMCP   RPO         JOURNALHISTORY         JOURNALSIZEMB
gb_vpg   Protecting          myz4ksite   myz4ksite   3              0             6          0            0         33      3 seconds   3 minutes 19 seconds   1
Notice here you can see the aspects of the VPG, but the crucial thing here is the NUMCP field, which is the number of Checkpoints. These are taken automatically and at very frequent intervals. In this case, these checkpoints are kept for a rolling 24 hours because of the JournalHistoryInHours: 24 line we added.
And that will capture all changes about the application, such as config changes, anything.
And it will capture all changes at every level, including at the database level. It protects the entire application!
Let’s tag a checkpoint with more specific information (notice also, this is literally making a checkpoint, so this is something you could do, I don’t know, as part of your automation):
root@UbuntuLinux-1:~> kubectl zrt tag gb_vpg "pre-restore"
tag pre-restore created successfully
Here’s a look at that:

Important: Now add a new line to your guestbook application (details are in the lab).
Now, let’s restore that checkpoint:
root@UbuntuLinux-1:~> kubectl zrt restore gb_vpg pre-restore
Task 99baa582-1ab0-4769-a5e0-3dc1c6ff279b StartProductionRestoreTestTask has been submitted: lockingKey=vpg:gb_vpg
root@UbuntuLinux-1:~> kubectl get ztasks
6a52dc2aa84b   gb_vpg   StartProductionRestoreTestTask   Start Production Restore VPG gb_vpg          Completed    06/02/2021 05:06:15   06/02/2021 05:09:09
That should take a few minutes, and you’ll have time decide if you want to commit that restore. Take a look at your guestbook application now. You should see that it restored from earlier posts before the restore checkpoint.
root@UbuntuLinux-1:~> kubectl zrt commit-restore gb_vpg
Task 92af91d8-4b9a-4e94-b3e9-c3d7c087ad10 ProductionRestoreCommitTask has been submitted: lockingKey=vpg:gb_vpg
root@UbuntuLinux-1:~> watch kubectl get ztasks
c3d7c087ad10   gb_vpg   ProductionRestoreCommitTask      Production Restore Commit VPG gb_vpg         Completed   06/02/2021 05:09:36   06/02/2021 05:12:47
Once complete, you should notice that your application is running and is now completely restored to the pre-restore checkpoint.
The main takeaway from all of this is that you should be able to leverage a lot of this through code and pipelines.
Additionally, the VPG protects the entirety of the application, bottom to top.
Hit me up on twitter @RussianLitGuy or email me at bryansullins@thinkingoutcloud.org. I would love to hear from you.

Nice job on the write-up, Bryan!
LikeLike