TL;DR – Skip down to the ESXi Slipstreaming: How It’s Done section if you like, but you might find the section about treating ESXi hosts as cattle interesting.
What is Slipstreaming?
For those of you unfamiliar with the term, slipstreaming is a method for integrating software patches automatically into an official installed version. This is a very common practice in the world of IT when the running patch-level you desire is higher than the installation release. However, in the world of managing VMware ESXi hosts, I find that it is not done as often as one might think. As to the reasons for this, I can only speculate:
It’s reasonable to believe that people are, for the most part, happy with VMware Update Manager (VUM), and with the “no big deal” installation of ESXi it’s also, “no big deal” to just run VUM on it as part of the setup process. There is absolutely nothing wrong with this approach at all.
I assume it may also have something to do with slipstreaming being available only through PowerCLI, which does have a learning curve, and might be “off the beaten path” for some VMware Admins.
Why Slipstream? ESXi Hosts as Cattle
But where I work, we have a use case that downright requires slipstreaming. We have implemented a “nuke and pave” model for our ESXi hosts. . . . Yes, ladies and gentlemen, we treat our ESXi hosts like they are cattle (after putting them into Maintenance Mode of course . . . silly goose!). At any time, any ESXi host in any cluster can be nuked and paved in place, or nuked in one cluster and paved into another cluster for flexibility in scale. And if you are going to automate this process, you might as well do it right by not requiring the extra step of updating it post rollout. Slipstreaming is perfect here.
We have already shown success with this. I work for a large retailer that isn’t Amazon, and during stay-at-home orders earlier this year, we had to scale up some of our ESXi clusters for a big online promotion and sale. For the fully-automated hosts with this nuke and pave model, we were able to, with a single touch, decommission them from one prod cluster and provision them into a new prod cluster in under 18 minutes . . . all at once. The details on how we did this was one of my first few posts here.
We were able to do this with a combination of Ansible/Ansible AWX and HPE’s Synergy Image Streamer which has a redundant, centralized boot-lun for the ESXi installations across all Synergy Enclosures. It is a best practice to minimize space usage across each of these hosts; the longer these Hosts hold and accumulate data, the more space they take up on the boot-lun.
Therefore, we never do ESXi patch updates. We simply build a new Gold Image and do fresh installs with the latest slipstreamed ESXi installation as VMware releases new Versions/Builds/Patches.
ESXi Slipstreaming: How It’s Done
We will be using the Deployment commands available through PowerCLI, and If I am not mistaken, this set of commands was originally built for use with vSphere AutoDeploy, but they can be used to build a slipstreamed ESXi image for whatever purpose you see fit. What follows assumes you have PowerCLI installed on the Windows machine of your choice, which brings me to your first requirement:
You must run PowerCLI from a Windows machine. There is currently no support for the Deployment commands on the PowerShell Core implementation on Mac/*nix:

. . . which is a bummer because you won’t get to see my super-awesome Mac iTerm2 with ZSH/Powerlevel10K and transparent window pretty screenshots . . . but that’s not important right now.
To find out if you have the proper Module, type the command Get-DeployCommand. The output should be as follows:
PS D:\> Get-DeployCommand

CommandType     Name                                               Version    Source
-----------     ----                                               -------    ------
Alias           Apply-ESXImageProfile                              6.7.0.1... VMware.DeployAutomation
Alias           Get-DeployCommand                                  6.7.0.1... VMware.DeployAutomation
Function        Get-AutoDeployCommand                              6.7.0.1... VMware.DeployAutomation
Function        Get-DeployMachineIdentity                          6.7.0.1... VMware.DeployAutomation
Function        Set-DeployMachineIdentity                          6.7.0.1... VMware.DeployAutomation
Cmdlet          Add-DeployRule                                     6.7.0.1... VMware.DeployAutomation
Cmdlet          Add-ProxyServer                                    6.7.0.1... VMware.DeployAutomation
Cmdlet          Add-ScriptBundle                                   6.7.0.1... VMware.DeployAutomation
Cmdlet          Copy-DeployRule                                    6.7.0.1... VMware.DeployAutomation
Cmdlet          Export-AutoDeployState                             6.7.0.1... VMware.DeployAutomation
Cmdlet          Get-DeployOption                                   6.7.0.1... VMware.DeployAutomation
Cmdlet          Get-DeployRule                                     6.7.0.1... VMware.DeployAutomation
Cmdlet          Get-DeployRuleSet                                  6.7.0.1... VMware.DeployAutomation
Cmdlet          Get-ProxyServer                                    6.7.0.1... VMware.DeployAutomation
Cmdlet          Get-ScriptBundle                                   6.7.0.1... VMware.DeployAutomation
Cmdlet          Get-VMHostAttributes                               6.7.0.1... VMware.DeployAutomation
Cmdlet          Get-VMHostImageProfile                             6.7.0.1... VMware.DeployAutomation
Cmdlet          Get-VMHostMatchingRules                            6.7.0.1... VMware.DeployAutomation
Cmdlet          Import-AutoDeployState                             6.7.0.1... VMware.DeployAutomation
Cmdlet          New-DeployRule                                     6.7.0.1... VMware.DeployAutomation
Cmdlet          Remove-DeployRule                                  6.7.0.1... VMware.DeployAutomation
Cmdlet          Remove-ProxyServer                                 6.7.0.1... VMware.DeployAutomation
Cmdlet          Remove-ScriptBundle                                6.7.0.1... VMware.DeployAutomation
Cmdlet          Repair-DeployImageCache                            6.7.0.1... VMware.DeployAutomation
Cmdlet          Repair-DeployRuleSetCompliance                     6.7.0.1... VMware.DeployAutomation
Cmdlet          Set-DeployOption                                   6.7.0.1... VMware.DeployAutomation
Cmdlet          Set-DeployRule                                     6.7.0.1... VMware.DeployAutomation
Cmdlet          Set-DeployRuleSet                                  6.7.0.1... VMware.DeployAutomation
Cmdlet          Set-ESXImageProfileAssociation                     6.7.0.1... VMware.DeployAutomation
Cmdlet          Set-ScriptBundleAssociation                        6.7.0.1... VMware.DeployAutomation
Cmdlet          Switch-ActiveDeployRuleSet                         6.7.0.1... VMware.DeployAutomation
Cmdlet          Test-DeployRuleSetCompliance                       6.7.0.1... VMware.DeployAutomation
Once successful, create a new directory for this work and navigate into it:
PS D:\> mkdir ESXiLatestPatch
    Directory: D:\

Mode                LastWriteTime         Length Name
----                -------------         ------ ----
d-----         6/9/2020   1:07 PM                ESXiLatestPatch

PS D:\> cd .\ESXiLatestPatch
PS D:\ESXiLatestPatch>
Next, download the latest ESXi ISO from your vendor and the latest patch from VMware into this directory:
PS D:\ESXiLatestPatch> ls

    Directory: D:\ESXiLatestPatch

Mode                LastWriteTime         Length Name
----                -------------         ------ ----
-a----         6/9/2020   1:16 PM      343346578 ESXi650-202005001.zip
-a----         6/9/2020   1:15 PM      389871616 VMware-ESXi-6.5.0-Update3-15256549-HPE-Gen9plus-650.U3.10.5.5.16-Mar2020.iso
Notice that I have both the latest installation ISO from HPE and the latest patch from VMware.
The hard part is over. The rest of this is easy-peasy:
Step 1: Add-ESXSoftwareDepot [VMWAREPATCH]:
PS D:\ESXiLatestPatch> Add-EsxSoftwareDepot .\ESXi650-202005001.zip

Depot Url
---------
zip:D:\ESXiLatestPatch\ESXi650-202005001.zip?index.xml
This adds the patch into the current PowerCLI session for use with the next commands.
Step 2: Get-ESXiImageProfile | ft -Autosize to find out the current ESXi Profile to slipstream:
PS D:\ESXiLatestPatch> Get-ESXimageProfile | ft -AutoSize

Name                            Vendor       Last Modified        Acceptance Level
----                            ------       -------------        ----------------
ESXi-6.5.0-20200504001-standard VMware, Inc. 5/20/2020 4:25:19 PM PartnerSupported
ESXi-6.5.0-20200504001-no-tools VMware, Inc. 5/20/2020 4:25:19 PM PartnerSupported
We are using the “standard” one for this installation.
Step 3: Use the Export-ESXImageProfile command to slipstream the patch into a newly created installation iso:
PS D:\ESXiLatestPatch> Export-EsxImageProfile -ImageProfile ESXi-6.5.0-20200504001-standard -ExportToIso -FilePath SlipstreamedESXiISOInstallationBuild16207673.iso
PS D:\ESXiLatestPatch> ls


    Directory: D:\ESXiLatestPatch


Mode                LastWriteTime         Length Name
----                -------------         ------ ----
-a----         6/9/2020   1:16 PM      343346578 ESXi650-202005001.zip
-a----         6/9/2020   1:38 PM      353249280 SlipstreamedESXiISOInstallationBuild16207673.iso
-a----         6/9/2020   1:15 PM      389871616 VMware-ESXi-6.5.0-Update3-15256549-HPE-Gen9plus-650.U3.10.5.5.16-Mar2020.iso
Now you are ready to use the new slipstreamed ESXi installation iso!
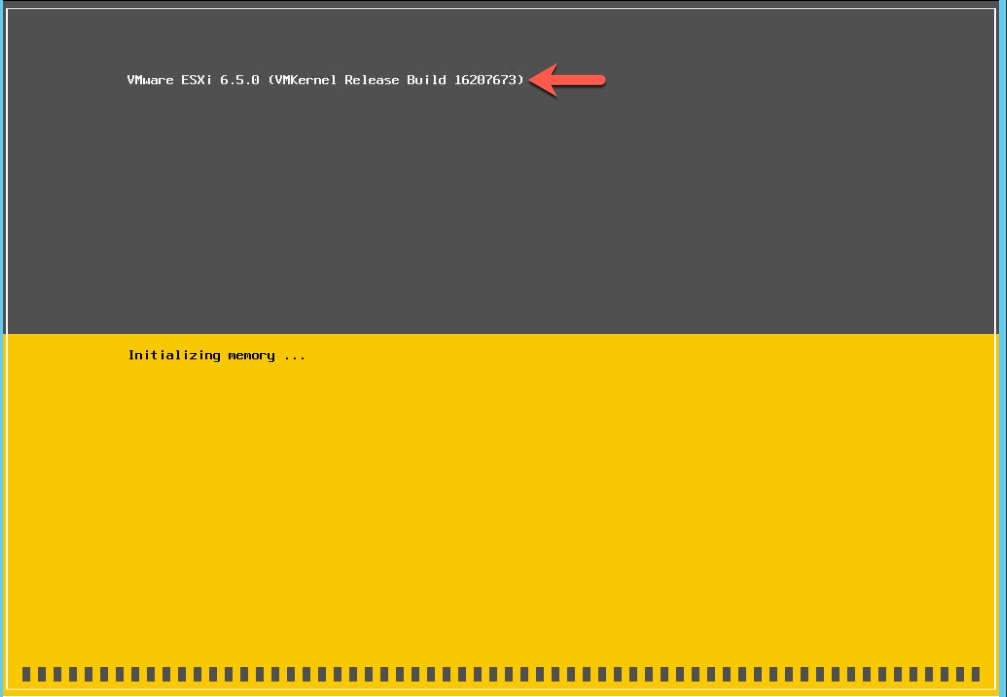
To verify that it has worked, when you perform the installation, the newest patch build number will show during its initialization:
Have fun storming the slipstreaming castle! Reference material is from this post.
Hit me up on twitter @RussianLitGuy or email me at bryansullins@thinkingoutcloud.org. I would love to hear from you!
